So, some fairly good progress on BB8, after a few setbacks. First of all, my corexy printer started failing. The hotend on it was just not performing well and the prints were a bit janky, so I decided to treat myself to a much higher end printer. After a bit of deliberation I decided to go with a Voron 2.4 with a 350×350 bed! It took a while to build it, but it is a great printer and so fast! Once that was working, it was full speed on BB8, at least for a bit!
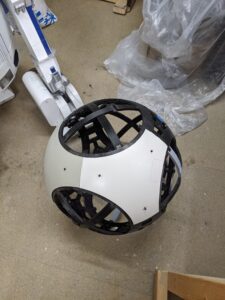
I’d already printed the triangle frames for BB8 out on the old corexy, so started printing the circles on the Voron. The speed meant it took less than a week to print them out, with some amazing quality. So, taking all the triangles from the old printer, a whole bunch of aluminium brackets that I’d made, and some counter sunk screws, I started putting the frame together, along with the one circle I managed before the old printer gave up. You can see the print quality wasn’t the best, but I figured I can solve that with sanding. There was also a fair bit of filing needed to let the aluminium brackets slot in freely, this should’ve been a warning really.


Then came the problem… With the frame together I went to install the other five circles. They were too big! Now, in the Vonjet instructions they say to use the same printer for everything and there is a good reason. Seems the old corexy was a tad out of calibration. Nothing that is easy to pick up on even a 20×20 calibration cube, but enough that on something the size of a BB8 body circle it is noticeable.
So, what to do? Well, print out the frame again on the new Voron! Again, thankfully it didn’t take too long (some repairs needed to the printer because of a duff rail) and I had all the parts printed. Back to assembly, this time correcting the error of using the wrong screws. I’d used steel screws initially, but of course magnets are used for the head so stainless screws were required!


This time it all went together nicely. Still a little bit of filing on a couple of the bracket slots, but the majority went in with no problems. I also did a couple of passes with filler and putty spray to start getting that nice smooth surface on the frame. Just need to work on the circles now (and reprint the one that I did on the old printer) and I’ll have everything ready for painting.
And on the painting front! I’ve decided on the colour scheme after giving Joy some line drawings of BB8 with the instructions to give me some options. Its going to be predominantly yellow, with blue highlights. I did some test pieces on failed prints to select the paint colours, using Montana Gold paints as they’re easy to get and a lot cheaper than the Halford rattle cans.
So I’ve a weekend or two of sanding, then I need to finish off the new version of the flywheel for the drive and install it. I’ve getting close to the testing stage of my drive! Should be interesting.