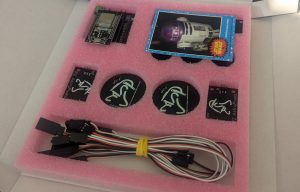
The Astropixels come as a ready to use kit, just connect the cables and give them some power! I have previously offered unsoldered sets for a small discount, but few people chose that option and by offering the full kit I can make sure every setup is properly tested before they leave me.
Before we start, a few warnings:
- Don’t plug/unplug the lights with power applied. Always remove power before adjusting cables, etc.
- Be careful with the micro-usb port. These are fragile and easily pulled off. Use the 5v connector.
- Do not give more (or less) than 5v. Use a stable 5v supply, anything more than 5v will damage the LEDs.
- Don’t try to power this with AA batteries. 3 of them is too low a voltage, and 4 is too high.

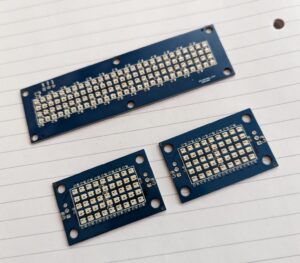
The kit comes with everything you need to light up an R2 dome. This includes 2 FLD boards, a RLD board, 2 PSIs, and 3 HPs. Also included are all the cables you need to route around the dome. Older kits had HPs with wires soldered on, newer kits have HPs with three pin headers. This made my job of assembly a lot easier and the mounting options a little better. If you are new to droid building, you can get a list of common terminology on the main droid wiki: https://astromech.net/droidwiki/Terminology
The recommended connections are as follows
- Breakout board -> RLD = 1 x 10cm
- Breakout board -> FLD = 1 x 30cm extension + 1 x 10cm
- FLD -> FLD = 1 x 10cm
- Breakout board -> FPSI = 1 x 30cm extension + 1 x 20cm
- Breakout board -> RPSI = 1 x 30cm
- Breakout board -> THP = 1 x 30cm extension + 1 x 10cm
- Breakout board -> RHP = 1 x 20cm
- Breakout board -> FHP = 1 x 30cm extension + 1 x 30cm
All outputs are clearly marked on the breakout board, just make sure that the cables are the correct way round. Typical colour standards are black for ground, red for 5v, and white for signal/data. Getting this wrong could result in damage to the light board.
The main breakout board is designed to mount on the back of the RLD, there is a 3d printable spacer on the Astropixels Extras post, or you can just use a stack of nylon washers or similar. Mounting the board here and running the cables as above should mean that everything can be kept neat and tidy against the inside of the dome.
The logics follow the same mounting hole pattern as the old teecees, so most club surrounds will work without any issues. The PSIs are also the same diameter so will fit in most of the mounts available. The Astropixels Extras page has files for printing or cutting bezels for the logics too. I recommend at least putting a clear acrylic layer between the light boards and the logic surrounds to stop little fingers getting in there. To avoid warping the board you can put a nylon washer between the layers.

For powering the lights, you can test using a usb cable from the computer to the ESP32, but do not power this way when inside the dome, the current consumption can get too high and cause a brown out, plus the connector can be fragile and easily broken off. I recommend a decent 5v buck converter or similar (with at least 1A of current) and to power it via the screw terminals. Voltage must be 5v, lower (like 4.5 from 3*AA) will quickly drop and they’ll stop working, and may damage the ESP32 from drawing too much current. More than 5v will damage the LEDs.
Interfacing with the system is done using one of the three sets of headers to the right. Top is i2c, with the pins being Clock, Data, +ve, and Ground. Then below that are the two serial interfaces with the pins Tx, Rx, +ve, and Ground. By default the code will be programmed with i2c enabled on address 0x0a. More details on how to trigger effects can be found in the ReelTwo documentation.
All boards are tested before shipping, but if you have any issues or questions, just give me a shout. You can also join our Droidbuilders Discord Server and chat more real time (and with other builders) https://discord.gg/VstCbqJAY8
If you want a set of Astropixels, my store can be found here: https://we-make-things.co.uk/product/astropixels/
If they are currently sold out, you can sign up for notification on the UK Droidbuilders Portal here: https://portal.droidbuilders.uk/parts-run/44

Are these plug and play if I get the assembled kit? And how do I order??
Sorry, I didn’t get a notification about a comment, so only just seen this.
If you order the assembled kit, then you just add power and they’ll work.
You can sign up for notifications on the Droidbuilders UK Portal (https://portal.droidbuilders.uk/). Just go to the parts run section and find astropixels, then you can subscribe for notifications.
Hi Darren,
just recently purchased a set of ‘Astropixels’ & they are fantastic! (have tested it via USB cable), But, not being electronically minded, I’m not too sure how to power it or how to interface it, can it be powered using a 5v power bank (like those to charge a mobile phone?
I see from one of your photos (the one with the 5 red buttons) that you don’t seem to be using the screw terminals for power, how are you powering this & how are the other wires (interfacing???) configured?
Many thanks.
Hi,
Thanks for the response! 😀
Whilst you can power them from a USB power bank, sometimes USB power may not be enough (max of 500mA, tho you can get higher ones but not sure if they need to communicate with the device to draw more), so I recommend powering them from a 5v buck converter hooked up to either the main power through a slip ring, or from a standalone battery in the dome. (maybe a 12v one?). The test bed I’ve got is just powered from the USB output of a Raspberry pi as its just for messing with.
That being said, if you want to keep it simple, then a usb power bank will be good enough if you aren’t triggering effects via a control system. Worst that can happen is a brown out and the lights reset. My test bed browns out quite often with certain effects that ramp up the current consumption.
If you work on a draw of 500mA @ 5v, then you can work out the size of battery you need. A powerbank for example that is rated at 10000mAH would (if they’re telling the truth and it isn’t a cheap chinese one sold using lies) would last about 100 hours.
The other wires like the serial and i2c can be ignored unless you’re hooking it up to your control system to trigger effects. For basic operation all you need is power.
Hello. I have a buck voltage converted. Besides the voltage output, I can set the amperage as well. What is the best amperage for the AstroPixels?
This is the voltage converter I got: https://www.amazon.com/gp/product/B07JZ2GQJF/ref=ppx_yo_dt_b_search_asin_title?ie=UTF8&th=1
It will only draw the amps that it requires, so you can set it to anything over about 1A.
That being said, it may be that you’re confusing constant voltage mode, and constant current mode. You want it in constant voltage mode, with the voltage set to 5v. I’m not familiar with that particular buck converter and as usual the instructions for them tend to be quite lacking.
Thanks. I’m sure I am confused 🙂 Your are right my buck instructions were terrible. But, I figured out how to change the output voltage. Set to 5 and seems to work great.
Another question I have: How do I get the holo projectors to light up when just plug and play? Or is that something I might need to re-program to do. Basically, I have the dome as a stand-alone display piece right now. Thanks.
Hey,
So by default the HPs will come on for a random amount of time for a random period. Something like between 60 and 180 seconds for 10-20 seconds. I’d have to dog through the code for the actual times, but that’s approx.
It can be changed in code for different durations.
If you have it hooked up to a control system you can also trigger effects using serial or i2c.
Something you might want to look at is a firmware someone else has done that adds WiFi to it and allows you to use the rtouch phone app to trigger effects, including the HPs.
https://github.com/reeltwo/AstroPixelsPlus
Not messed with it personally, but heard good reports about it.
Great thanks. Yes later I plan on gettin fancy. But I have just a stand-alone dome for now and wanted to keep it simple. Thanks for the quick response. I will check out that link.\
Hi Darren, I bought a set of astropixels second hand from another builder. I have them installed and up and running, but I’m wondering about triggering affects on them, such as changing colors on the logics. I understand it will require serial or i2c commands, but I don’t see any documentation on how to do this. Can you point me in the right direction? Many thanks.
David
Hey,
So there are some other pages on this site for altering things, and the whole system is based on the ReelTwo library. There is documentation for that on their site:
https://reeltwo.github.io/Reeltwo/html/index.html
The logics and PSIs both use the LogicEngine code.
Hi there,
Please could you advise if you ship to New Zealand?
Thanks
Richard
As per the product page, I ship world wide.
Hi my name is jeff, I would like to get some info about the Astropixels and the PSI lights where to order them and the cost the plug and play. what i have seen there the best for the R2D2 build thank you for the info.
Hi,
All details can be found on the product page:
https://we-make-things.co.uk/product/astropixels/
Hey Darren. I am building a R2 unit as a school project for my computer science class. We have your AstroPixel light kit for the dome of the bot. Me and my partner have been struggling on a way to control the lights without the use of the AstroPixelsPlus web GUI. Do you have any suggestions on fixing this problem and controlling them via a bluetooth controller? It is also important to note that we are using a Raspberry PI 4 as our control system.
Hey,
I use a bluetooth controller (PS3) with a pi to run my droid. You can find my code here:
https://github.com/dpoulson/r2_control
It will communicate with the astropixels (and servos) using i2c, and expose everything via a REST API. It isn’t the most user friendly of set ups unfortunately, even after 11 years its still a work in progress. Tho it works well enough in my droid, I just have many tweaks to do make it more user friendly. I don’t run the astropixels plus firmware myself, just the basic code, and have various key combos set to trigger effects on the lights.
When starting the r2_control.service file we are experiencing an error code 203 with gunicorn that states the service failed to start. Have you seen anything like this before, and could you help us to fix this problem? We have tried a lot of troubleshooting methods with none being successful.
Hi. Hooked up my lights for the first time. And nothing comes on. Except for a solid red light on the controller. Any ideas?
Hey,
Better if you email me. Could be all sorts of reasons. And if you do, a picture of how you’ve wired them, or a video, would be a help in debugging.
Sir, I know you got roughly 1.246M questions of this same content, I’ll apologize in advance! I’m excited in anticipation of the order of your lights I made just a couple days ago! However, now I finally applied thought!?! The power supply, ok, I was going to order the same buck converter via Amazon that a string above did, I was just wondering if you have a better suggestion? I totally want to be able to set 4.8vdc and 3a , I mean hey, you’re the builder/creator and know exactly what your kit wants, I read that, now I just want to feed it as many onions as it wants and don’t overdo it and wipe s*** out!
Thoughts? If I get the little buck converter via Amazon that a string above mentions, it has a ton of great reviews, if I use it, take power frov m one of my Ryobi cordless batteries? I’ll look for a possible “printable or purchased” holder?
In addition, sorry, what cabling, terminal, plug(s) do I need to connect power from buck converter to breakout board or does the board have screw in sockets for power “in”?
Hey,
So the board has some screw terminals to connect the output from the buck converter. (Make sure the polarity is correct). The buck needs to be set for 5v and should just draw the current it needs, its the voltage that is critical. They’ll draw about 700-800mA typically.
The linked converter is probably a bit overkill. I use these ones a bit:
https://www.pololu.com/product/2850
Copy! Thanks a bunch mate! I’ll see if I can find a printable Ryobi battery socket/dock so my dome will have UNLIMITED POWER lol! , Just pretty rad!
I’m guessing I’ll diffuse with some fine sanded plexi?
If I want to use the i2c for communication from the body arduino to control them, can I just use the Clock and Data pins to the SDA and SCL on the arduino? Or will I need to also supply 3.3v and ground to the i2c V/G pins?
Should just need the sda and scl, tho its still a good idea to add a gnd connection too.
Hi Darren I just wanted to let you know the astropixels arrived safe and sound and to say I’m over the moon with them would be an understatement. Many thanks and hopefully I can do them justice and get them installed soon. Many thanks again.
Mike.
Thanks for letting me know. Any issues just drop me an email!